As package developers, we often focus on custom functions, their documentation, and unit testing. To provide a more complete user experience, it can be helpful to include data within the package. Here’s everything you need to know!
Short on time? Here’s the gist
In this article, we present the different ways to incorporate data (broadly defined) into an R package. We cover the three directories used for storing data and explain how to access them, whether you are a package user or a developer. Finally, we discuss best practices for documenting these data.
Why Include Data in a Package?
Including data in a package can be useful for several reasons:
- Simplifying package usage: The data included in the package is directly accessible to users.
- Facilitating reproducibility: The data allows users to replicate the examples provided in the documentation.
- Enhancing unit testing: The included data can be used for testing the package functions.
- Sharing information: Distributing documentation, scientific articles, code samples, etc.
Here, “data” should be interpreted broadly. It includes tabular data typically used in R (e.g., CSV or XLSX files, or data.frame objects), but also images, configuration files, articles, code samples, etc.
Data Directories in an R Package
There are three directories in an R package used to store data: data-raw/, data/, and inst/, each serving a specific purpose and catering to different audiences (developers vs. users).
The data-raw/ and data/ Pair
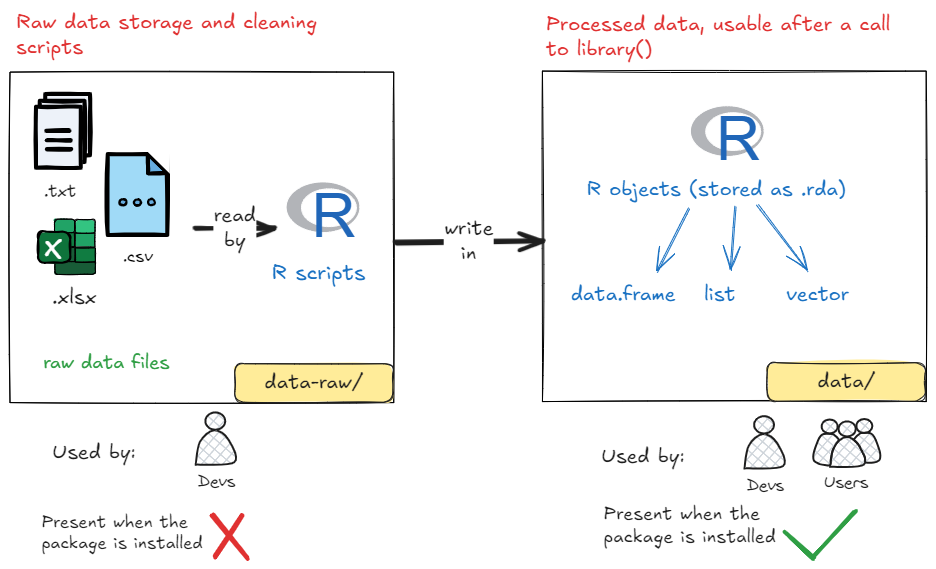
The goal here is to make data available to package users, which can be used by the package’s functions or included in the documentation examples. These data will be represented as R objects (e.g., data.frame, list, etc.).
The inst/ Directory
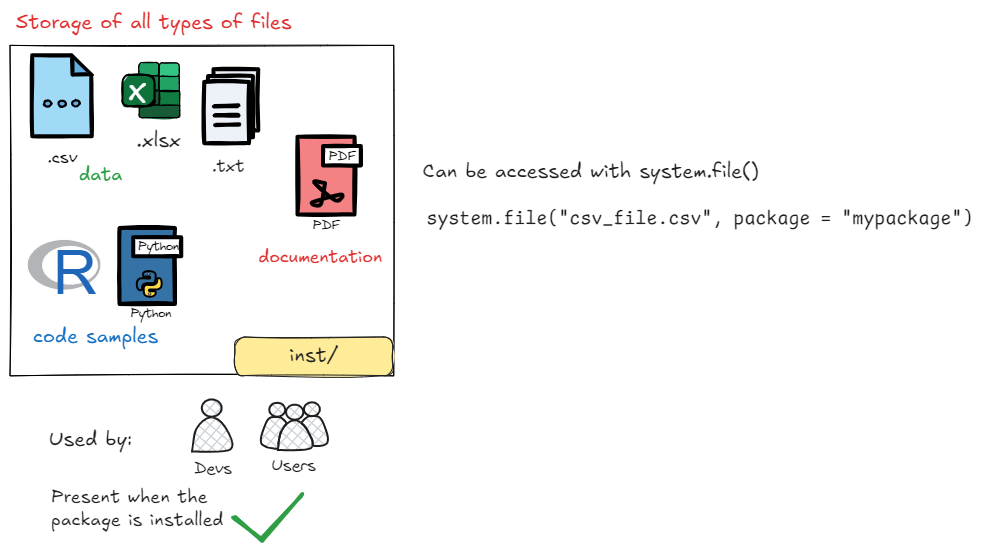
This directory allows you to store files without format restrictions: tabular files, code sample scripts, notebooks in Rmd/Qmd format, PDF documentation, etc. There are no limits.
Using data-raw/ + data/
Use case: You want to make data available to package users that can be used by the package’s functions. The goal is to provide native access from the package’s functions. You’re probably familiar with preloaded datasets in R like mtcars or iris; this follows the same principle.
data-raw/
The data-raw/ folder is used to store scripts for preparing the data. Files in this folder are not included in the final package installed on the user’s computer but contain the code needed to generate the datasets that will later be included in the package.
data/
Once prepared in data-raw/, the data is stored in the data/ folder. Files in this folder are included in the final package and are accessible to users. The files are stored in .rda format and are loaded when a user runs library(mypackage).

Example
Create the
data-raw/folder using the commandusethis::use_data_raw("my_dataset_demo"). This command creates amy_dataset_demo.Rfile in thedata-raw/folder.Prepare the dataset in the
my_dataset_demo.Rfile:
# Create a sample of the "starwars" dataset from the dplyr package
# See https://github.com/tidyverse/dplyr/tree/main/data-raw and https://github.com/tidyverse/dplyr/tree/main/data
library(dplyr)
library(readr)
starwars_raw <- read_csv("data-raw/starwars.csv")
starwars_sample <- starwars_raw |>
  sample_n(size = 10)
usethis::use_data(starwars_sample, overwrite = TRUE)
After running the command
usethis::use_data(starwars_sample, overwrite = TRUE), you’ll see a file namedstarwars_sample.rdain thedata/folder.There’s still some work to do: now we need to document the dataset. For this, we will use the
{checkhelper}package.
checkhelper::use_data_doc("starwars_sample")This creates a doc_starwars_sample.R file in the package’s R/ folder. The file contains the dataset’s documentation. You can now edit this file to add more information about the dataset
`r #' starwars_sample #' #' Description. #' #' @format A data frame with 10 rows and 14 variables: #' \describe{ #' \item{ name }{ The character's name } #' \item{ height }{ numeric } #' \item{ mass }{ numeric } #' \item{ hair_color }{ character } #' \item{ skin_color }{ character } #' \item{ eye_color }{ character } #' \item{ birth_year }{ numeric } #' \item{ sex }{ character } #' \item{ gender }{ character } #' \item{ homeworld }{ character } #' \item{ species }{ character } #' \item{ films }{ character } #' \item{ vehicles }{ character } #' \item{ starships }{ character } #' } #' @source Source "starwars_sample" While the overall structure of the file should be preserved, you can edit the description, format, and source information as needed.
Finally, generate the LaTeX documentation using the command devtools::document() or attachment::att_amend_desc().
Once your package is installed and loaded, you can access the dataset using the command data("starwars_sample").
Using inst/
Use case: You want to store files intended for use only in unit tests or to share additional documentation (e.g., a scientific article).

Example
Create the
inst/folder at the package root:dir.create(here::here("inst")).Place the desired files in the folder.
Install the package.
The files are now accessible using a special function:
system.file(), which points to the root of theinst/directory. For example, to access a file namedarticle.pdfin theinst/folder, you would usesystem.file("article.pdf", package = "mypackage"). If the file is in a subfolder called “doc,” you would usesystem.file("doc", "article.pdf", package = "mypackage").
Note: system.file() does not read a file; it only returns the file path.
Conclusion
You now know all about incorporating data into an R package. You’ve learned how to store data in the data-raw/, data/, and inst/ directories and make it accessible from the package functions. You’ve also learned how to document these data to make them usable for package users.
Whether the data is intended for users or developers, you now have all the tools to enrich your R package with data. Happy coding!